Digital printing can help launch a packaging project quickly, but speed doesn’t eliminate production mistakes.
A box can look fine in a design file and still run into problems once it reaches the press. Colors may print differently than expected. Small text can become harder to read. Some packaging finishes look great during approval but show wear after shipping, handling, or retail display.
By that point, changes are rarely simple. The artwork has been approved, production is underway, and what looks like a minor issue can lead to reprints, delays, wasted inventory, or added costs.
That’s why printing decisions deserve more attention during development. How you handle offset printing, packaging coatings, and file preparation affects the quality of your product packaging and whether it holds up during shipping. Addressing these details early also helps prevent production delays before the final product reaches customers.
This guide covers the essentials, from printing methods and coatings to finishes, prepress, and preparing files for packaging.
Overview: From Design File to Finished Packaging
A print project doesn’t move in one clean line. It starts with digital files, but the real process is a chain of handoffs. Design builds the look. Prepress checks if the file is actually print-ready.
Then the printing process puts ink, color, and detail on the material. Finishing adds the parts people notice first, including coating, foil stamping, embossing, soft-touch effects, cuts, and folds. Last comes assembly and packaging, where everything still needs to hold its shape and survive shipping.
Stage
What Happens
Common Errors
How To Avoid Them
Design
Layout, artwork, dieline setup
Text too close to cuts, wrong color build
Keep safe zones clear, build from the approved dieline, and set colors for print right away.
Prepress
File checks, proofing, adjustments
Missing bleed, low-res images, font issues
Export truly print ready files, outline or package fonts, and check image resolution before anything goes to production.
Printing
Ink goes on substrate
Color shift, registration problems
Approve a realistic proof, match ink choices to the material, and do not expect screen color to fully predict the final product.
Finishing
Coating, lamination, foil, folding
Cracking, peeling, misaligned effects
Test finishes on the actual stock, especially around folds, and leave room for effects that can shift a little in the finishing process.
Final packaging
Assembly, packing, shipment
Weak structure, scuffing, bad fit
Check folds, glue areas, and pack-out early so the packaging still works after printing and handling, not just when it is flat.
Most production mistakes start earlier, when a file looks fine on screen but was never built for the final product. That is why prepress matters. It catches issues before they become expensive. If you’re comparing custom box printing options, this is often where the important decisions happen.
Packaging Printing Methods: Understanding the Printing Process
Digital Printing
Digital printing is the method brands usually pick for short runs, quick edits, or fast launches. It works without traditional printing plates, so the file goes straight from screen to a digital press. That cuts setup time significantly. It also makes on-demand printing practical, which matters when a brand tests a new SKU, runs seasonal packaging, or fixes copy without wasting old stock.
A digital printing press prints directly from a file, so there is less prep before the machine starts production.
It’s a strong fit for low-MOQ work, realistic mockups, and fast-turn packaging jobs where waiting on plates adds cost. Digital printers also support variable data printing, which can be used for versioned packaging, regional text changes, batch coding, and short campaign runs.
The big advantage of digital printing is flexibility. You can change artwork fast, print smaller quantities, and reorder only what is needed. The tradeoff appears later. At higher volumes, the cost per unit usually stays higher than other options. So, it wins on agility, not always on scale.
Digital printing isn’t only for small brands using custom packaging. Bigger companies use it when they need to learn fast. That’s part of why this market keeps moving. A recent projection puts digital packaging printing at $46.2 billion by 2029, driven by demand for customization, personalization, and rapid prototyping.
Digital printing offers flexibility by printing on a wide range of substrates, including paper, cardstock, fabric, and plastics, while supporting variable data printing that allows every printed piece to be uniquely customized. It also improves sustainability through reduced waste and the use of water-based inks.
Offset Printing
Offset printingis built for longer runs and stable production. In offset lithography, the image is first transferred to printing plates, typically aluminum or other metal plates. Then the image moves from the plate cylinder to a rubber blanket on the blanket cylinder, and onto the material through the impression cylinder. That extra transfer step gives the method its name. Ink doesn’t go straight from the plate to the board.
Offset presses use ink rollers to apply ink to the plate, but only in the image areas. Then the image transfers through the blanket and onto the printed sheet or roll.
This setup takes more time at the start because the aluminum plates must be made and the press has to be tuned. Yes, the setup cost is higher. But once it is running well, offset printing becomes more cost-efficient at scale. That is why it’s often the better fit for high-volume packaging.
It’s known for clean text, sharp detail, and consistent quality across large runs. Offset packaging printing is projected to reach $12.3 billion by 2033, primarily due to the demand for sharper images and cleaner text. That consistency matters more in packaging, especially when boxes from different batches sit side by side on a shelf.
Web offset printing can push this even further for large-volume work, especially where speed and output volume matter more than quick design changes.
Offset printing is often chosen not because it is old-school, but because it’s predictable. And predictability saves money when runs get big.
Offset printing is the preferred choice for print runs of more than 1,000 copies, delivering higher print quality than digital printing. The process uses a sequence of rotating cylinders, with dampening rollers applying water to non-image areas, and includes wet offset and waterless offset methods.
Common production formats include sheet-fed offset, which uses pre-cut sheets of paper, heat-set web offset, which dries inks through evaporation, and quick-set printing, which uses fast-drying inks to accelerate production.
What’s the Best for Your Print Project: Digital Printing vs Offset Printing
Choosing between digital printing and offset printing usually comes down to where the pressure is. If the job needs speed or short quantities, digital makes more sense. If the job is built for large runs and tight visual consistency, offset carries the load better. Both printing technologies can produce excellent packaging, but the following factors often determine which method makes the most sense:
Factor
Digital Printing
Offset Printing
Cost
Lower upfront cost for short jobs because setup is lighter. Per-unit cost usually stays higher as quantity grows.
Higher setup cost at the start because plates and press prep are involved. Lower per-unit cost on bigger volumes.
Volume
Better for small runs, test batches, versioned packaging, and quick reorders.
Better for medium to large runs where the artwork is locked and repeat output matters.
Lead time
Faster to start, so overall speed is usually better rush jobs and on-demand printing.
Slower at the front end because of setup, but efficient once the run is underway.
Print quality
Strong for many printed materials, especially when turnaround matters, though color matching options can be more limited on some jobs.
Known for steady quality, consistent color reproduction, cleaner fine detail, and better consistency across long runs.
Best use case
Short-run packaging, low MOQ jobs, and projects with frequent artwork updates.
High-volume packaging, brand-sensitive work, and jobs where the method produces repeatable results over time.
One overlooked difference is decision risk. Digital printing is easier when you are still learning – new product, new market, new design direction. Web offset printing works better when the decisions are already made, and you need the result to stay stable across volume.
It’s also worth noting that while digital and offset dominate most packaging projects, they aren’t the only options. Other printing methods, like flexographic and gravure printing, are still used for specialized packaging applications.
That’s why the print method should follow the packaging plan, not the other way around. If the structure, artwork, and shelf goals are still shifting, starting with product packaging design decisions first usually saves money later.
Packaging Finishes Explained
Packaging finishes affect the way a box feels in someone’s hands, but they also influence durability. Some finishes help printed surfaces hold up better during shipping and handling. Others are chosen almost entirely for appearance.
Many packaging designs would look very different without the finish applied. In some cases, the finish ends up carrying as much visual weight as the artwork itself.
Lamination
Matte lamination gives a softer, flatter look. It’s good when you want the graphics to feel more restrained and premium. It can help protect the surface from scuffs, though dark matte stocks still tend to show rubbing.
Gloss lamination makes colors look brighter and sharper. It adds a cleaner, reflective visual effect that can help simpler packaging look more eye-catching without altering the artwork itself.
Soft-touch lamination changes the feel more than the look. It has that smooth, almost velvety finish that people connect with higher-end products. It works best when touch is part of the brand story, not just the visuals.
Specialty Finishes
Spot UV adds gloss only to selected areas – and that contrast is the point. A logo, pattern, or product name can stand out against a matte background without adding more color.
Foil stamping uses metallic or pigmented film to create a brighter, sharper accent. It’s one of the quickest ways to change brand perception to luxe, but it needs restraint. Too much foil can flatten the design instead of lifting it.
Embossing raises parts of the design above the surface. Debossing presses them inward. Both change the look and feel of the finished pieces. They work best when there’s enough open space around them. Crowded artwork usually kills the effect.
Coatings
Aqueous coating is often used for light protection and a smoother finish without adding a film layer. It helps protect the printed piece and can come in gloss, satin, or matte finishes.
UV coating cures fast and creates a stronger shine or harder surface than many other coatings. It’s useful when the package needs more punch visually, though not every box style or fold handles it equally well.
Why Finishes Matter
They help protect against scuffing, fingerprints, and shelf wear.
They shape the visual effect of the packaging without changing the core design.
They influence brand perception fast. A Behavioral Sciences study linked packaging visuals to both brand experience and purchase intent. People read texture and shine almost instantly.
They can make finished pieces feel cheap or considered. Small difference on paper, big difference in hand.
A finish should match the job the package has to do. Some need toughness, while others need contrast.
Packaging Coatings Selection Guide by Packaging Type
Choosing packaging coatings by box type makes more sense than choosing by finish name alone. A coating that works on a beauty cream box may be a bad call for fast food packaging or transit-heavy product packaging. The real question is simple: what does the surface need to survive, and what does the package need to say while doing it?
Food Packaging
Best coating direction: Food-safe, non-toxic coatings with compliant material choices
The first priority is safety. The coating has to protect the pack without creating concerns around direct or indirect food contact. This matters on boxes like custom food packaging boxes and even handled formats such as kraft cake boxes with handle, where handling is part of the use case.
Shipping Packaging
Best coating direction: Scuff-resistant and durable coatings
Shipping boxes deal with rubbing, stacking, tape, and rough movement. A cleaner finish is nice, but toughness is a top priority. Coatings that resist scuffing can help boxes stay presentable throughout storage, transit, and delivery.
Luxury Packaging
Best coat direction: Premium finishes with selective coating use
Luxury packs often combine packaging coatings with foil, embossing, or soft-touch details. The point is not just shine. It’s control. A restrained coating in a luxury wine carrier, for example, can make the material feel richer and give the whole box a more deliberate finish, which fits presentation-driven product packaging.
Retail Packaging
Best coating direction: Balanced coatings that support both shelf appeal and handling
Retail boxes need to look good under store lighting and still hold up after packing, stocking, and customer handling. For custom retail packaging boxes, the best option is usually the one that keeps graphics sharp while helping protect the printed surface. Retail boxes often pass through multiple hands before purchase, making resistance to fingerprints, scuffs, and shelf wear just as important as appearance.
Prepress Essentials: Building a Print-Ready File
What is Prepress?
Prepress is the stage where digital printing files are checked and adjusted so the press can reproduce the artwork the way it was designed. A print-ready file means the digital files already match the technical rules of printing. The correct size, proper color mode, bleed setup, and usable file format all must be in place before the job moves into production.
If the file is not print-ready, the printer has to guess. And guessing is how colors shift, text clips, or edges get cut.
Color Mode: CMYK vs RGB
One of the most common problems with print-ready files starts with color.
Printing works in CMYK: The process combines cyan with magenta, yellow, and black inks to reproduce full-color artwork.
If digital files stay in RGB, the press must convert them. That conversion rarely looks identical to the original screen color. Reviewing artwork in CMYK before production gives a more realistic picture of what will actually print.
Resolution and Image Quality
Resolution problems are easy to miss during design review because screens can hide them. The issue usually shows after printing, especially when artwork is enlarged.
Images should generally be prepared at 300 DPI at the final print size.
Enlarging low-resolution artwork can result in blurry or pixelated prints.
Vector artwork scales without losing detail, making it a common choice for logos and icons.
Low-resolution images create the same problems on packaging as they do on photo paper: soft details, blurry edges, and poor image quality. For that reason, many printers prefer vector versions of logos whenever they’re available.
Bleed Area, Trim, and Safe Zones
Packaging designs extend beyond the final cut line for a reason.
Bleed refers to artwork extending past the cut line. The bleed area usually adds about 3 mm around the design so edges print clean even if cutting shifts slightly.
Trim marks show where the final cut happens.
Crop marks guide the trimming equipment during finishing.
Without bleed, small cutting shifts can leave white edges on the package. That detail alone ruins a lot of otherwise good print-ready files.
File Formats That Printers Expect
Some formats hold print data better than others.
AI (Adobe Illustrator) keeps vector artwork, layers, and editable elements intact. It remains a standard format across the printing industry, particularly for packaging dielines and structured designs.
PDF is the most widely accepted format for a final print ready file because it locks layout, fonts, and images together.
EPS is an older vector format still used for logos or isolated graphics that must scale cleanly.
Prepress rarely gets attention, but it decides whether the final package looks intentional or slightly off. Small file details make a surprisingly big difference once ink hits the board.
Print Ready File Checklist
If the print-ready setup is incomplete, the press team ends up adjusting your digital files. That slows production and sometimes changes the artwork completely.
Here is a simple check before sending print-ready files.
Correct color mode. Printing uses CMYK inks. RGB files should be converted before export to prevent color shifts during production.
Proper bleed and margins. The bleed area extends past the trim edge, so color reaches the border even if the cut shifts slightly. Crop marks and trim marks must be visible to guide finishing equipment and help align the cutting stage.
High-resolution images. Each image should be clear at the final print size, not stretched from a smaller source.
Fonts outlined or embedded. This prevents missing font substitutions when the file opens on another system.
Dieline correctly applied. The layout should match the final dieline dimensions, not a scaled version. Structural guides should remain separate from the printable artwork.
File exported in correct format. Most printers prefer a press-ready PDF, though AI or EPS may still be used for editable packaging files.
For accurate production, text should remain within a 0.125-inch (3 mm) safety zone from the trim edge, and print-ready files should be exported as Adobe PDF documents using Press Quality settings.
☐ File built to the correct dieline size ☐ Artwork kept within safe margins ☐ Dieline placed on a separate locked layer ☐ Files organized and labeled
2. Color Settings
☐ Document set to CMYK ☐ Colors built using cyan, magenta, yellow, and black ☐ RGB colors converted before export
3. Bleed and Trim
☐ Bleed added on all sides (typically 3 mm / 0.125 in) ☐ Background graphics extend into the bleed area ☐ Trim marks added at final cut lines ☐ Crop marks included where required
4. Images and Graphics
☐ Images are 300 DPI at final size ☐ No stretched or pixelated graphics ☐ Logos and icons supplied as vector artwork
5. Fonts and Links
☐ Fonts outlined or embedded ☐ Linked images included ☐ Missing fonts or links resolved
6. File Export
☐ Exported as a press-ready PDF ☐ Layers flattened where required ☐ File approved for production
Final Approval: ____________________
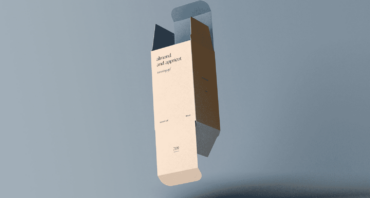
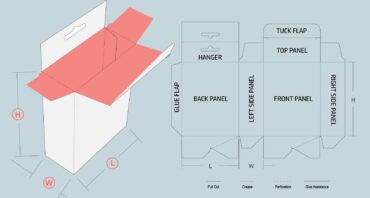
Packaging Dieline Template Example
Most packaging dielines are provided as AI files, but the structure often follows a layout similar to the example below.
Document Setup
Box size: 200 × 120 × 60 mm
Bleed: 3 mm
Document size: 206 × 126 mm
Layer Structure
Layer
Example Content
Artwork
Product graphics, logos, typography, and background colors
Cut
Spot-color cut line (typically magenta or red) showing final trim paths
Fold
Dashed fold lines showing where the package bends
Bleed Guide
Outer boundary marking the bleed area
Safety Margin
Area where important text and logos should remain
Printer Notes
Coatings, finishes, foil areas, embossing zones, or color instructions
Common Printing & Finishing Mistakes
Most problems appear late but usually start earlier in the file. Small setup issues in the print-ready file tend to snowball once production begins.
RGB files sent to print. When RGB files reach the press, colors shift during conversion. This can change the look of the final product, even if the design looked perfect on screen.
Ignoring bleed areas. Without the bleed, tiny cutting shifts expose white edges. The box still works, but the quality feels off.
Overusing premium finishes. Foil, embossing, and gloss layers each work well on their own. Combined without restraint, they compete for attention and lower perceived quality.
Wrong coatings for the job. Some coatings protect delicate surfaces; others are built for durability. Using the wrong one for the product’s handling often damages the final product before it reaches the shelf.
How to Choose the Right Printing & Finishing Setup
Budget
Budget usually drives the decision. Digital printing has lower setup costs, making it a practical choice for smaller runs. Offset printing requires more setup, but unit costs fall as volume increases. The same tradeoff applies to finishes. Premium options add cost, while basic packaging coatings often provide enough protection on their own.
Order Volume
Short runs benefit from the faster speed of digital production. Large runs favor offset printing because stable press output and higher production efficiency reduce overall cost.
Branding Goals
Brand identity often guides finishing decisions. Subtle finishes can make packaging feel refined without overwhelming the design. A restrained finish paired with the right coatings creates a stronger impression than heavy decoration.
Product Type
Items that travel through shipping or handling need durable packaging coatings to protect the surface. Premium retail goods often rely on packaging finishes that strengthen the presentation while supporting efficient production.
Custom Printing & Finishing Solutions with Refine Packaging
Packaging production works best when the printer is involved early. Refine Packaging operates less like a vendor and more like a technical printing company that helps shape the process before files reach the press.
Advanced Printing Capabilities
We support both digital printing and offset printing, allowing brands to choose between proven printing technologies based on the needs of the project rather than forcing the project to fit the press.
Wide Range of Finishes
We offer controlled professional printing paired with finishes that shape the final presentation.
Matte, gloss, and soft‑touch lamination
Foil stamping, embossing, debossing, and spot UV
Durable packaging coatings that protect the printed surface
These finishing options are chosen based on how the package will actually be handled, not just how it looks on screen.
Prepress & File Support
Our team reviews and prepares print‑ready files, checks dielines, and validates layout structure before production begins. That support helps reduce technical issues from becoming costly press delays whether the job uses digital printing or offset printing.
Material & Coating Recommendations
Different products place different demands on packaging. We work with multiple materials and recommend packaging coatings and finishes based on the product type—food, retail, shipping, or luxury presentation. The goal is balance: durability, appearance, and realistic cost for the business.
Sampling & Quality Assurance
We can provide printed samples before full production begins. This gives brands a chance to review colors, structure, and finishing details before committing to a larger order. It also confirms the packaging will exceed expectations before production moves forward.
Request a quote, review a sample, and get support with your print-ready files before production begins on your next print project.
Step-by-Step: From Design File to Printed Packaging
Packaging production usually follows a simple structure once the files are prepared correctly.
Create the packaging design. Build the layout using the final dieline and correct dimensions.
Prepare a print-ready file. This should include bleed, trim marks, and properly organized layers.
Choose the printing method. Select between digital printing for short runs or offset printing for larger quantities, where stable output is a priority.
Select finishes and coatings. Add packaging finishes like foil or embossing if needed, and choose packaging coatings that protect the surface during shipping and handling.
Review proof and sample. Ask for proofs to confirm color accuracy and layout placement before the job moves forward.
Approve for production. Once everything checks out, the packaging moves into full production.
Conclusion
Printing decisions have a lasting impact on how packaging looks and performs. The right combination of digital printing, offset printing, packaging finishes, and packaging coatings helps maintain consistency from one run to the next.
Strong prepress work is also vital. Clean print-ready files reduce errors, delays, and unnecessary rework once production begins.
Working with an experienced vendor can help align printing, finishing, and file preparation from the start, making it easier to move from concept to finished packaging with fewer surprises.
Erica is a professional writer and brand strategist at Refine Packaging who is based in Denver, Colorado. With a background in writing and journalism, Erica entered the manufacturing industry 8 years ago to deepen her passion to demystify difficult packaging concepts. With years of in-the-field printing experience, Erica is uniquely suited to help unpack the custom packaging process for beginners looking for an impactful box style that resonates with their target audience. When she’s not writing, Erica can be found with her nose in a fantasy novel or climbing The Rocky Mountains (and sometimes, doing both at the same time).


 Alex Jasin
 Asif Muhammad

 Erica Campbell

.svg)
Share