Mailing a bubble mailer isn’t just sliding something in and sealing it. To ensure package safety, choose a size and style that fits.
Match the mailer to the item.
Weigh and measure before you ship.
Address it clearly.
Place labels for clean scanning.
Pack for stability.
Choose the right service.
Refine Packaging helps businesses pick bubble mailers that fit their products and brand.
How to mail a bubble mailer isn’t just about slipping an item inside. I’ve seen eCommerce sellers lose batches of orders when the wrong size pushes shipments into a higher postage bracket. A bubble mailer is the middle ground between a plain envelope and a shipping box. It can cushion a smaller item securely and important documents without extra weight, keeping postage low.
As part of the larger padded mailers category, a market projected to reach$2.56 billion by 2030, bubble mailers are accepted by most carriers and processed easily at your local post office.
In this guide, you’ll learn how to address a bubble mailer correctly and how to ship a bubble mailer for personal use or youreCommerce Packaging insights.
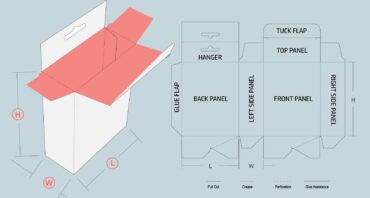
How to Mail a Bubble Mailer: Choosing the Right One
Not every shipment calls for a box. Knowing what is a bubble mailer and its options can help you send smaller items more efficiently.
Different types of bubble mailers
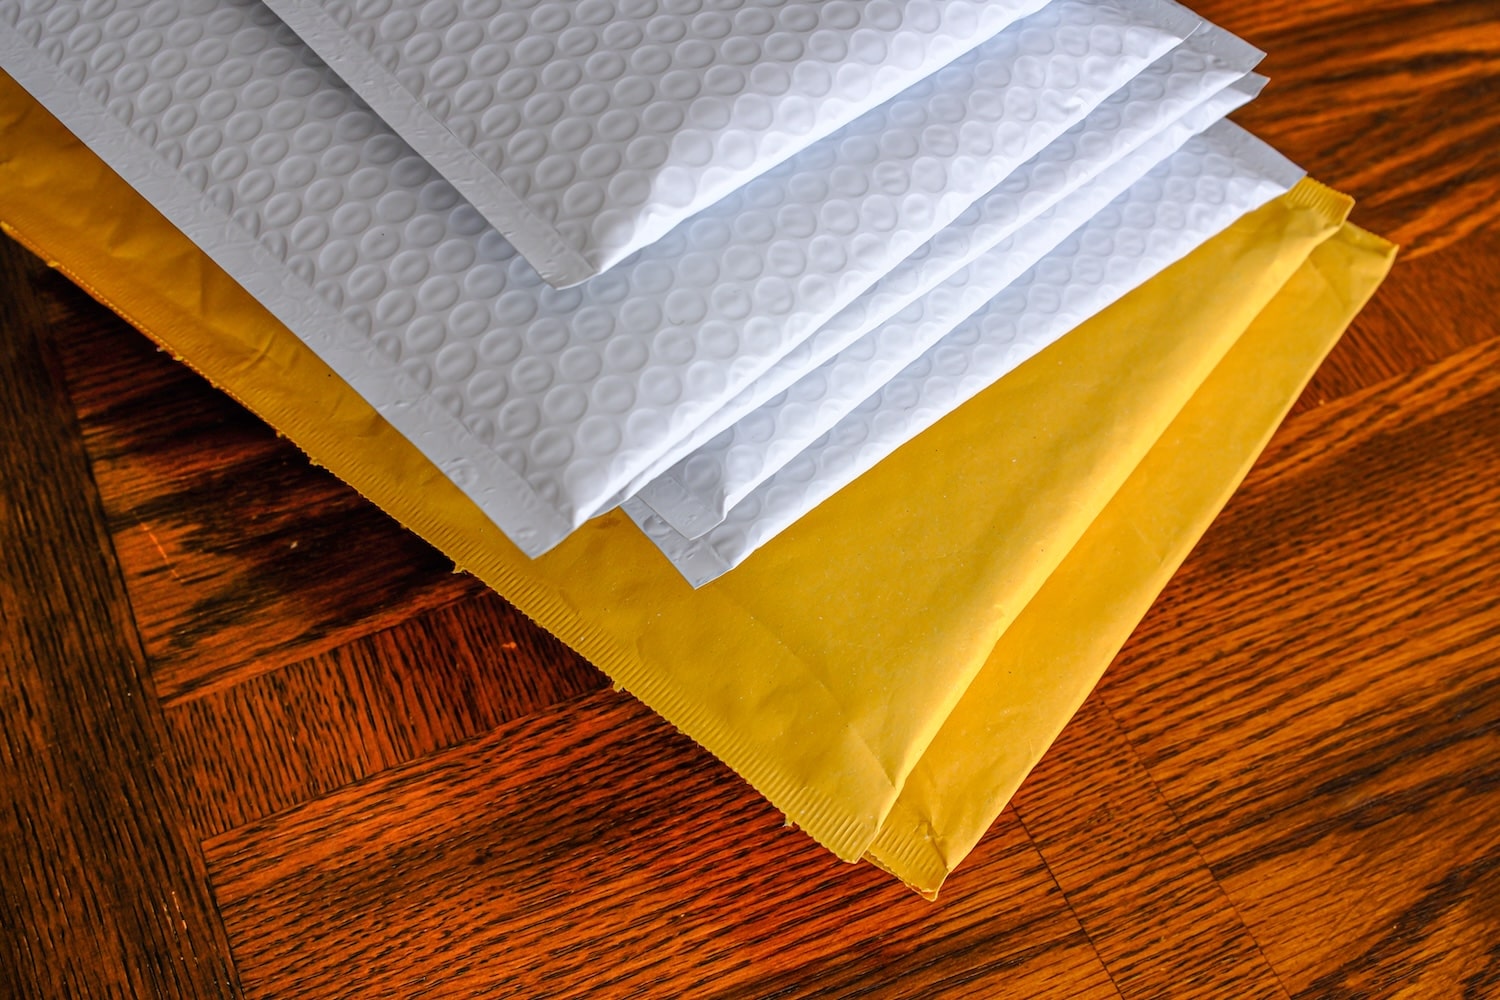
A bubble mailer is a padded envelope with a bubble wrap lining that absorbs bumps while staying lightweight, capable of shipping smaller items of various sizes. The first step in learning how to mail a bubble mailer is to know its variety:
Self-sealing bubble mailer
Peel-and-stick flap option; zero extra tape needed. Quick to close for batch orders, especially ineCommerce shipping.
When to use: High-volume shipping where speed matters. Works well for clothing, books, and other non-fragile goods.
Padded envelope
Kraft paper outside, bubble lining inside. This is the best choice when bending is a concern or you need lightweight but protective packaging.
When to use: Protects small electronics, books, or signed documents. Add a thin layer of protection for small pieces like jewelry or fragile items like USB drives.
Eco-friendly bubble mailer
Made fromrecycled paper, biodegradable film, or both. The compostable mailers variety is great for short-haul routes. The paper-based bubbles break down faster in curbside recycling.
When to use: Businesses aiming for sustainable shipping without losing basic protection.
Specialty bubble mailer
Options include poly-coated, tamper-evident, or custom-branded. Choice should balance protection needs and the image your bubble mailer business wants to send.
When to use: When you need high-grade, moisture-sensitive protection, or marketing strategies where presentation is part of the experience.
Sizing guide: Matching mailers to package contents
If the mailer’s too small, seams will strain; too large and contents will shift. Even if you’ve learned how to fill out a bubble mailer properly, a tight or oversized fit can still fail in transit. The right bubble mailer depends on the item’s dimensions and any interior wrapping. Pull out a measuring tape and check your item’s dimensions, then add about half an inch of space on each side to avoid warping or dented corners. That extra space and effort mean you save money from going down the drain.
If you’re packaging multiple items, put down the oversized mailer. Instead, use two smaller boxesor mailers to keep each piece safe. This tactic is also more cost-efficient as it prevents a jump into a higher postage rate. Many suppliers and carriers publish detailedmailer size charts to match product types to the right packaging.
Weight and thickness considerations for different shipping services
Size aside, weight and thickness determine your shipping class and cost. Most carriers measure thickness at the thickest point, so even a slim item in a tight mailer can be treated as a package if it crosses the envelope threshold.For reference:
A 4×8 small bubble mailer weighs roughly 0.5 to 0.7 ounces empty.
A 6×9 comes in around 0.8 to 1.2 ounces.
An 8.5×11, or any larger option, can reach 2.5 ounces before you’ve even added the product.
To keep protection without extra ounces, swap bulky padding for efficient cushioning like air pillows or thinner bubble sheets.
How to Address a Bubble Mailer: Best Practices
The next crucial step in how to mail a bubble mailer is getting the address right. A legible, well-placed address matters just as much as the padding inside. One small slip — a missing ZIP, unclear handwriting, or a label in the wrong spot — can slow delivery or have the mailer sent back. The same best practices also apply if you’re wondering how to address a padded envelope for any carrier.
How to write an address on a bubbler mailer
ForUSPS,FedEx, andUPS, the return address goes in the top left corner of your bubble mailer. The recipient’s address should sit front and center, where it’s easy to spot, not creeping over seams or folds. Dark ink or a printed label works best, but the goal is contrast — something the scanner can lock onto fast.
Skip fancy fonts. If you’re handwriting, stick to ALL CAPS and give the letters breathing room. With international shipping, add the destination country on the last line so it clears customs without guesswork.
Where to put the shipping label on a bubble mailer
If you’re printing a shipping label or postage label, place it just below the return address area. USPS prefers barcodes to run parallel with the longest side, while UPS guidelines recommend centering the label to prevent edge damage during conveyor handling.FedEx follows a similar layout, keeping the barcode in a clear, flat space.
If your label overlaps with a seam, put a strip of clear tape to keep it in place. Make sure the barcode is left uncovered.
How to fill out a bubble mailer for smooth delivery
When you fill out a bubble mailer, think like the person who’s scanning and sorting it. They need clear, accurate info in the right spots, or your package risks delays.
Put the return address, recipient address,and any special notes (like “DO NOT BEND”) exactly where your carrier expects them.
Reusing a mailer? Strip off every old label or cover them completely so nothing confuses the scanners.
USPS Publication 177 notes that the easiest labels for scanners to read use a 10–12-point OCR-friendly font. That means Arial, Helvetica, and Courier are your best choices.
Sending in bulk? Pre-made address templates or an integrated label printer can save you from typos and wasted time.
If you also ship in custom shipping boxes, match your label placement on both. That small habit keeps you within carrier guidelines and makes packing a lot faster.
Packing and Securing Items in Padded Envelopes
Packing a bubble mailer isn’t just about guarding against big impacts. Small wear, like corners rubbing bare or edges curling, can matter just as much to the person opening it. Before you seal the flap, fix anything that could stop it from arriving exactly as you packed it.
How to fill out and pack a bubble mailer properly
Part of figuring out how to mail a bubble mailer is to check how stable the contents feel before you send them.If you’re forcing the flap closed, it’s too tight. Aim for a fit that closes easily but doesn’t allow too much movement.
Try shaking the item; if it shifts easily, it needs an extra layer of padding paper. Line one at the bottom and the sides. Press the flap with your finger so the seal sticks all the way across. Keep in mind that adhesive can sometimes lose grip when it’s too hot or cold, so keep the sealed mailers lying flat until you drop them off. Following the shipping and fulfillment guide can help keep your packing consistent from one order to the next.
Tips for protecting fragile items inside a bubble mailer
A standard bubble lining on padded envelopes works for books or flat paper goods, but fragile pieces need extra care. Here’s what I watch for when packing:
Shield sharp or pressure points: Wrap corners, clasps, or edges in something soft so they don’t pierce the lining. That includes “hidden” weak spots like enamel pins, small devices with screens, or certificates that crease easily.
Center the weight: Keep the heaviest part of the item in the middle so one side doesn’t sag. Uneven weight makes it easier for packages to snag or get mis-sorted on conveyor belts.
Mark for the handling you want:For items that could warp, “KEEP FLAT” often works better than “FRAGILE.” If your items require special handling, ask if the markings can be specific. On-point markings tend to get more attention.
If the shipment might be returned, like a product sample or trial, include a second flat mailer or foldable envelope so the return trip is just as protected.
When to reinforce packaging with extra padding or tape
Reinforcement isn’t just for delicate items. It can prevent surface damage from rubbing or humidity. Slipping a small print into a thin poly sleeve before packing keeps the ink intact.
Reinforcing also becomes important if you’re unsure how your carrier will categorize your bubble mailer. Is it going to be a package or an envelope? If it’s treated as a package, it might pass through heavier machinery, take more impact, and sometimes cost more to ship. In those cases:
Tape the flap ends so pressure doesn’t pull them open.
Add a lightcard insert to keep it from bending without adding much weight.
Check your carrier’s international guidelines for material restrictions. Some countries limit plastic or foam filters. Swap them forcorrugated cardboard or layered kraft sheets instead. It’s also important to double-check your carrier’s regulations if the shipment contains hazardous materials.
How to Ship a Bubble Mailer
When you’re deciding how to mail a bubble mailer, measure and weigh once, then match the service.
Choosing the right shipping carrier and service
Check two things first: weight and thickness. Before you buy postage, run this quick list:
Weigh the sealed mailer.Even a single extra ounce from padding can bump you into a higher rate.
Measure the thickness. Over ¾ inch is package pricing with USPS. UPS and FedEx generally treat bubble mailers as parcels either way.
Check stamp eligibility. Truly light, flat pieces (under 1 oz and within letter specs) can ship via First-Class Mail with Forever Stamp. Thicker mailers require package postage. Don’t try to solve it by stacking stamps; if you’re calculating how many stamps you’d need, you’re probably in parcel territory.
Understanding how carriers classify bubble mailers
Knowing whether a bubble mailer is treated as a package or an envelope by your carrier can prevent missed delivery windows and counter fees. USPS uses strict size/thickness limits for letters, large envelopes, and packages. UPS and FedEx price padded envelopes as parcels. Sending something fragile, like small electronics or signed prints? Choose a service with tracking included from the start.
Calculating the cost to ship a bubble mailer
How much it costs to ship a bubble mailer depends on several factors:
Weight
Size
Delivery speed
Destination
Extras like tracking, insurance, and signature on delivery add up as well.
Use your carrier’s rate calculator with the sealed mailer’s weight and dimensions before you print the label. That puts you in the right pricing tier on the first try and helps you avoid underpaying — and having the mailer delayed or sent back mid-route.
Tracking and ensuring safe delivery
After you’ve learned how to send a padded envelope under the right class, tracking confirms it reached the right address. USPS includes this feature with package services; stamped letters and flats need it added. If you’re unsure how to mail a padded envelope with tracking, pick a package service that includes it by default.
Double-check your receipt and don’t lose it until the recipient confirms delivery. This is especially important if you’re sending jewelry, legal documents, or something you can’t easily replace.
Choose the Right Bubble Mailer Supplier for Your Shipping Service
The right bubble mailer doesn’t just keep your items safe. Pick well, and it can cut postage costs and help your packages land exactly when they should. Details matter here — like choosing a size that fits without strain or placing the label where a scanner sees it right away. Those small steps can be the difference between a smooth delivery and a damaged return.
At Refine Packaging, we match you with bubble mailers that suit your products and reflect your brand. You’ll find options from eco-friendly padded envelopes to custom-printed designs that make your shipments feel on brand. Use the steps in this guide, and you’ll know how to mail a bubble mailer with confidence.
FAQ
How to address a bubble mailer?
Put the recipient’s full name, street address, city, state, and ZIP right in the center front.
Add your return address to the top left so it’s easy to spot.
If you’re not sure how to address a bubble mailer for international shipping, match the destination country’s format so it clears customs without hiccups.
How to send a bubble mailer?
Drop it off at the post office, a shipping store, or schedule a pickup online. When choosing how to send a bubble mailer, match the service and requirements to how fast you need it there. For small bubble mailers, Forever Stamps may work, but only if they meet First-Class Mail size and weight limits.
How to label a bubble mailer?
You can use either a handwritten or printed label. Printed labels scan faster at sorting facilities, while a neat handwritten label works just as well. Use ink that won’t smear if the mailer gets damp or handled roughly.
How to mail a padded envelope?
Pick a carrier that matches your budget, delivery timeframe, and need for tracking. USPS is a solid choice for a lightweight bubble envelope, while UPS and FedEx are better for heavier or time-sensitive deliveries.
Where to write the address on a bubble mailer?
Put the address label in the center of the largest side of the bubble mailer. That placement makes it easier for scanners and sorters to read.
Erica is a professional writer and brand strategist at Refine Packaging who is based in Denver, Colorado. With a background in writing and journalism, Erica entered the manufacturing industry 8 years ago to deepen her passion to demystify difficult packaging concepts. With years of in-the-field printing experience, Erica is uniquely suited to help unpack the custom packaging process for beginners looking for an impactful box style that resonates with their target audience. When she’s not writing, Erica can be found with her nose in a fantasy novel or climbing The Rocky Mountains (and sometimes, doing both at the same time).


 Alex Jasin
 Amanda Jane Rivera

 Asif Muhammad
 Erica Campbell


.svg)
Share