Nailing your packaging design workflow right from the jump can be the only thing keeping you from a massive, expensive headache later. People in the packaging industry know that packaging design isn’t just about making a box look good on screen. It can be a minefield.
One day, you’re fixing a layout issue. Next, you’re emailing the supplier the wrong file version. Sometimes the artwork looks fine on screen, but the finished print comes back blurry or misaligned. Any of these issues can be costly.
That’s why we put this guide together. We’ll cover the tools, templates, and packaging design resources commonly used across the industry, along with practical advice on creating dielines, collaborating with suppliers, and preparing print-ready packaging files for production.
Overview: Packaging Design Workflow
Brands can lose up to 20% of artwork cycles to versioning errors, burning through millions on reprints and missed launch dates. A solid packaging design workflow is your roadmap to avoid navigating blind and making costly mistakes.
To keep things on track, you need to understand how the design process connects to your tools at every step.
Workflow Stage
What Happens Here
Essential Tools
Essential Resources
Concept
Ideation, mood boarding, and defining project goals.
Miro, sketching tools, measurement tools
Pinterest boards, packaging briefs, material samples
Design
Creating the actual visuals, layout, typography, color schemes, and other design elements that appear on the final package.
Sending final files to the printer for mass manufacturing.
Preflight software, automation scripts, secure FTP systems
Approved production files, printing company specifications, quality-control checklists
The packaging design workflow follows a set order because every stage builds on previous choices. Change the dimensions after the dieline is locked, and the artwork needs reworking. Approve a proof without reviewing the latest revision, and that mistake can sneak into production. Skip the sample stage, and you might not spot fit or assembly issues until hundreds or thousands of packages are printed.
Different tools support different parts of the packaging design process. By the time a project reaches production, everyone involved, from the designer to the custom packaging vendor, should be working from the same approved files and specifications.
A strong workflow will not catch every problem but it gives your team more chances to spot issues before they become costly.
That makes a difference whether you produce a handful of packages or prepare for a major commercial launch.
Packaging Design Software for Beginners and Professionals
The software you use directly affects how easily a packaging project moves through the workflow. Some tools are designed for quick concepts and simple layouts. Others handle production files, dielines, and commercial printing requirements.
Beginner-Friendly Design Software
Canva is often the starting point for businesses creating packaging concepts in-house. It’s accessible, easy to learn, and useful for visualizing ideas before moving into production.
Canva works well for:
Simple box layouts
Early-stage packaging concepts
Basic branding applications
Quick presentations and client reviews
Teams that need to create mockups without advanced design skills
Its limitations lie in technical accuracy. Canva struggles with complex vector paths, and you can’t easily build or manipulate structural folds. For example, relying solely on Canva for complex custom shipping boxes will likely lead to sizing errors because you cannot precisely track bleed lines and registration marks. That’s when more specialized design software is necessary.
Professional Design Software
Adobe Illustrator remains the industry standard because it gives packaging designers and printers greater control over production files.
Key advantages include:
Support for scalable vector graphics without losing quality
Precise artwork placement
Better management of layers
The ability to place production notes on a separate layer
Compatibility with custom dielines and print workflows
Adobe Illustrator lets you keep artwork, text, and structural dielines completely independent. For projects with multiple revisions, custom structures, or detailed graphic design, Illustrator is often the safest choice.
Alternative programs like Affinity Designer offer great vector tools at a lower cost. They’re a practical option for smaller teams or businesses that don’t need advanced collaboration features.
Choosing the Right Tool
The best choice depends on the project’s complexity, your personal ability or experience level, and your budget.
Use beginner or alternative tools if you’re designing a straightforward label for a standard box, have a tight budget, and are not dealing with complex structural folds.
Upgrade to professional software if your product packaging design involves unique structural folds, custom windows, foil stamping, or complex embossing.
A tool should match the project requirements. Don’t risk a major printing error just to save a few dollars on a subscription. Match your tool to the package’s complexity to save yourself many headaches later.
For more guidance on packaging artwork and file preparation, see our product packaging designguide.
Packaging templates are pre-built layouts for common packaging structures. They are generally flat, pre-measured blueprint files that map out exactly where a package will be cut, folded, and glued.
You’ll find box templates for many familiar formats, including mailer boxes, corporate gift boxes, cereal boxes, folding cartons, paper bags, and other forms of recyclable packaging. These templates contain the basic structural layout, saving time during early project stages.
Benefits of Using Templates
The main reason designers use templates is speed. Much of the structural work is done, allowing teams to focus on artwork and file preparation. Templates also help reduce setup mistakes, which can reduce waste caused by avoidable revisions and reprints. Fold lines, cut lines, and panel placement are often established, giving designers a cleaner starting point.
Many packaging teams also use template libraries as a starting point when developing new packaging concepts for different products and customers.
Templates are usually a good fit for:
Standard boxes with common dimensions
Basic retail packaging
Early-stage concepts and internal reviews
Projects with tight timelines
Smaller design budgets
Limitations of Templates
Sometimes the problem isn’t the template itself. It’s trying to make a “perfect template” (for others) to fit your product. At a certain point, modifying the file becomes more work than creating a custom structure.
Templates become less useful when you need:
Custom product dimensions
Complex structural designs
Specialty inserts or compartments
Unusual folding or opening mechanisms
Highly customized packaging
When to Use Custom Dielines Instead
A custom dieline usually makes more sense when packaging has unique requirements, a complex structure, or innovative packaging concepts that can’t be supported by standard templates.
Subscription kits, specialty inserts, e Commerce bundles, multi-piece packaging, and unusually shaped food products often fall into this category.
Instead of wrestling with manual measurements, designers are now using smart packaging software to build layouts instantly. New platforms use automated algorithms to calculate fold physics and structural math on the fly. This skips the trial-and-error work traditionally required to build a custom box from scratch.
Understanding Packaging Dielines and Structural Packaging Design
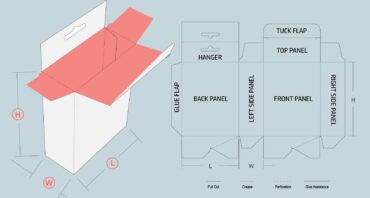
What Is a Dieline?
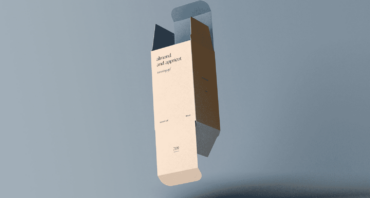
Before your box is folded into its final 3D shape, it exists as a flat production blueprint. That flat layout is your packaging dieline, and once your sizing, structure, and materials are locked in, this file keeps your designers, printers, and manufacturers aligned.
Unlike a generic template used as a rough starting point, a custom dieline reflects the exact final specifications of your package. It accounts for precise dimensions, how the box is assembled, and the specific packaging materials you chose. If any details shift, the blueprint must change accordingly.
This is where structural packaging design comes in. Every decision about the package’s physical look, how it opens, internal inserts, and material thickness directly dictates how the flat file is built.
Cut lines: Solid lines that tell the machinery exactly where to slice the material.
Fold lines: Dashed markings that guide the creasing wheels.
Bleed lines and safe zones: Boundaries that ensure your graphics extend past the edges to prevent accidental white borders.
These markings may look technical, but they help prevent some of the most common production problems before printing even begins.
Dieline Workflow Explained
A typical dieline workflow follows five stages:
Structural design creation: Figuring out the physical dimensions based on the product.
Dieline generation: Sourcing a layout template or building a custom dieline from scratch.
Design placement: Laying your vector artwork precisely over the structural lines on a separate digital layer.
Proofing and adjustments: Checking orientation to ensure text isn’t upside down when the box is put together.
Final production file: Locking down the artwork and embedding color profiles.
Each step depends on the previous one. If the structure changes after artwork is applied, the design may need repositioning. If the proof reveals sizing issues, the dieline may require another revision before final approval.
Common Dieline Mistakes
Many packaging errors can be traced back to the dieline stage, including:
Misaligned artwork: If you don’t track how panels connect when the box is fully assembled, your text or graphics will end up upside down or split awkwardly across the edges.
Ignoring bleed lines: Without enough bleed, small trimming variations can leave unwanted white edges around the finished package.
Incorrect dimensions: Even being off by a single millimeter means your product won’t fit or the tabs won’t lock.
These problems often aren’t obvious until a proof or physical sample is reviewed. That’s why many businesses choose a custom dieline for unique products or complex packaging structures.
If your project requires a specialized layout, Refine Packaging can help you create a dieline built around your exact specifications.
Creating Print-Ready Files for Packaging Production
Many packaging projects get held up at the final stage because the wrong file is sent. The printed copy returns with questions about color settings, missing bleeds, low-resolution images, or an export issue blocking production.
CMYK vs RGB Color Modes
Most packaging teams work in CMYK from the start rather than converting files later. RGB colors can shift during prepress, especially brighter shades that are hard to reproduce with ink.
Setting the document to CMYK before creating artwork reduces surprises during proofing and helps ensure the final printed packaging matches what was approved on screen.
Resolution Requirements
Image quality is harder to fix once a package reaches proofing. A product photo might look acceptable during design reviews, but softness and pixelation become obvious when printed full size.
Most printers recommend preparing raster images at 300 DPI at their final size. This provides enough detail for the press to reproduce photographs and graphics cleanly. Enlarging an image significantly to fit the layout can result in losing quality, especially when the original image wasn’t created for print.
A logo might appear on several package sizes before the project is finished, from folding cartons to bottles and labels. Vector-based artwork handles those changes much better than standard image files.
File Formats
Different vendors may request various formats, but most packaging teams use a combination of editable and final-delivery files:
AI files for working designs and revisions
EPS files for vector-based artwork
PDF files for proofs, approvals, and final submission
It’s common to submit an editable design file and a final PDF of the same project. One is for review and approval; the other is for changes before production begins.
Print-Ready Checklist
Before sending print-ready packaging files, confirm that:
Artwork is set to CMYK.
Images meet resolution requirements.
Bleed areas are included.
Fonts are embedded or outlined.
The dieline matches the approved dimensions.
The correct file version has been approved for production.
All print ready files have been reviewed against the final proof.
Packaging Designers vs DIY Design
When to DIY
If you’re working with a standard box style, existing branding assets, and a template, handling the design internally can be reasonable. DIY approaches work best when the packaging structure is established and the goal is updating graphics rather than creating something new. Budget is also a factor.
When to Hire a Professional
A professional designer can help when packaging requires custom inserts, retail display needs, multiple SKUs, or a custom dieline. These projects involve more than creating artwork. Files must be prepared correctly, production requirements considered, and revisions organized throughout the process.
That’s where strong project management often becomes just as important as design skills.
What to Look for in a Designer
When vetting potential packaging designer partners or agencies, look closely for these three non-negotiables:
Package-specific experience. Look for packaging designers with experience in structural layouts, not just branding. A good designer can account for assembly, weight, and shelf presentation.
Print-production familiarity. Your designer should be well-versed with printing requirements and how a printing company prepares files for production. Ask about spot colors, file separation, and prepress workflows.
Portfolio relevance. Don’t just look at the aesthetics of their past work; look at the construction. Ask to see the packaging dielines they created for previous clients, especially if your project involves specialized structures.
Packaging Design Collaboration Tips
Communicating with Designers and Suppliers
Packaging projects involve designers, suppliers, internal reviewers, and printers may all be working from the same files at different stages. The goal is ensuring everyone works from the same information.
Sharing Dielines and Assets Correctly
Many packaging problems start with file management. Some simple habits can help:
Store approved files in a central location.
Label revisions consistently.
Share updated packaging dielines immediately after changes are approved.
Keep artwork, proofs, and production files together.
Avoid circulating multiple versions of the same file through email chains.
Reviewing Proofs Efficiently
Proof reviews tend to focus on logos, colors, and copy. That’s important, but it’s not the only thing worth checking. Before approving a proof, confirm dimensions match the latest dieline, artwork hasn’t shifted into fold areas, and the printer uses the correct file version.
Packaging Design Best Practices
Effective packaging design balances form, function, and compliance to create a memorable customer experience from the first unboxing. The process begins with a creative brief defining brand values, goals, target audience, budget, and functional requirements, followed by market research to identify competitive opportunities and the development of primary, secondary, and tertiary packaging.
Successful packaging combines visual, tactile, and informational elements with strong visual hierarchy, consistent branding, clear product and legal information, ease of use, functional durability for handling and shipping, and full compliance with applicable industry regulations and standards.
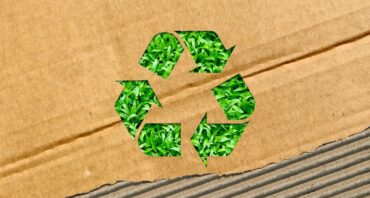
Sustainable packaging reduces environmental impact while maintaining product protection and regulatory compliance. Using eco-friendly materials, such as recyclable glass, reclaimed ocean plastic, bio-based materials, and other resource-efficient alternatives, can strengthen brand perception while reducing material consumption and waste.
Common Packaging Design Mistakes to Avoid
The margin for error on a printing press is practically zero. If you want to keep your budget intact, stay far away from these structural and technical traps:
The Trap
Why It Ruins Your Run
How to Fix It
Designing without a dieline
Skipping packaging dielines often results in misaligned artwork after assembly.
Get the approved dieline from your manufacturer before starting the artwork.
Ignoring print requirements
Incorrect dimensions or material thickness can cause fit issues long before the package reaches production.
Test the package with a paper mockup before approving production..
Overcomplicating the design
Hidden layers, missing assets, and unnecessary effects can create problems during prepress review.
Review fonts, effects, and linked assets before exporting final print ready files.
Not testing before production
Some issues don’t appear until the package is assembled. A physical prototype helps identify them before production.
Review a physical sample before moving into production.
Packaging Design Support from Refine Packaging
Getting the design right is only part of the job. Files need to be reviewed, structures validated, and production requirements considered before anything reaches the printer.
Refine Packaging supports both the design and execution sides of the process. Our services include:
Custom dieline creation for virtually any box style
Structural layouts and packaging engineering support
Guidance on software, templates, and file preparation
Proofing and sample reviews before production
Coordination between design and manufacturing teams
Flexible solutions for startups, growing brands, and larger organizations
Our packaging designers can review artwork, structural layouts, and production files before manufacturing begins. Businesses can work with one company throughout the project.
If you need help developing a custom dieline, validating a structure, or preparing files for production, Refine Packaging can assist. Request a quote for custom packaging or start with a sample before full production.
Step-by-Step Checklist From Idea to Print-Ready Packaging
Most successful packaging projects follow a similar packaging design workflow:
Define your concept: Map out your dimensions, material goals, and retail requirements.
Choose your software: Lock down your design tools based on your project’s structural complexity.
Secure your blueprint: Request a verified structural dieline from your manufacturing partner.
Execute the artwork: Place vector designs and text on a separate layer above the cut lines.
Audit the technicalities: Run through your preflight checklist, checking color modes and bleed lines.
Order a physical sample: Never skip prototyping; hold the physical box to test structural strength.
Generate print ready files: Choose your fonts, embed your graphics, and export to a high-res PDF.
The design process may vary by package, but skipping steps usually creates more work later.
Conclusion
Most packaging problems don’t start on press day. They usually show up much earlier during file setup, dieline revisions, proof reviews, or sample testing. That’s why a solid packaging design workflow matters.
Software and templates help, but neither can replace a well-built structure, accurate files, and a proper review process. Pretty graphics don’t mean much if the cutting machine misinterprets your lines or your colors turn out muddy on the cardboard.
Good packaging design comes from hundreds of choices made throughout the project. Mapping your structural layout, checking bleed areas, and preparing print-ready packaging files can prevent costly production issues.
The goal is simple: create print-ready packaging files that move into production without unnecessary corrections. For more complex projects, experienced packaging designers can help keep the process on track.
Amanda is a professional writer and brand strategist at Refine Packaging who is based in Los Angeles, California. With a background in writing and journalism, Amanda entered the manufacturing industry 6 years ago to explore her unique passion for beautifully conceptualized packaging. With years of packaging experience, Amanda has a deep understanding about how brand psychology and box design trends impact emotions and desired actions. When she’s not writing, Amanda can be found snuggling her two Beagles or outdoors sipping on sparkling white wine.


 Alex Jasin
 Asif Muhammad

 Erica Campbell

.svg)
Share